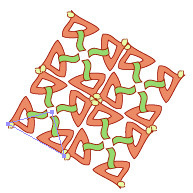
In this tutorial you will solve two such problems of increasing difficulty. First you will orient a pattern so that it is periodic in both horizontal and vertical directions. Then you will add the pattern of a different symmetry type to the first pattern and adjust the orientation of the second pattern relative to the first one. As an added bonus, you will learn to combine patterns of different types, which greatly expands the variety of designs you can create with SymmetryWorks.
Many precision alignments, including some of those discussed here, can be simply avoided if you remember to preserve the fixed orientation of the objects during your edits. The single most useful habit is to hold down the Shift key when editing the control path. You may also find it useful to employ Illustrator's grids, and especially the Snap To Grid command from the View menu, at the critical moments of creating your SymmetryWorks patterns.
However, it is equally easy to orient your pattern created without any extra precautions. Here, again, Smart Guides provide invaluable assistance. To turn them on now, choose View > Smart Guides.
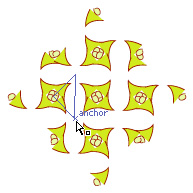
1 Start by creating a new SymmetryWorks pattern or open the file Handles.ai that accompanies this tutorial. Locate the control path (Smart Guides outline the control path when the pointer passes over it).
2 Make a horizontal guide somewhere near the control path. To make the guide, choose View > Show Rulers (if the rulers are not already displayed), click the top ruler, and drag it to the desired position.
3 Choose Edit > Select All.
4 Zoom-in on the control path.
5 Click the left anchor of the control path and drag it towards the guide until a text label hint identifies the guide path. The control anchor is positioned precisely on the guide.
6 With the entire pattern still selected, click the rotate tool. Click once the left control anchor to set the point of origin of rotation. Then click the top anchor of the control path and drag it in a circular motion towards the guide until a text label hint identifies the guide path. The pattern snaps to the required orientation.
7 You do not need the guide any longer. Delete it by choosing View > Guides > Clear Guides.
The first pattern for this exercise is the one that you have just aligned. The second pattern can be taken from the file Baskets.ai. You will add the "baskets" from the second file to the "handles" in the first one (peek at the last image in this tutorial to have the target in mind). To position the second pattern precisely, you will need to add a supporting point that is not in the pattern yet.
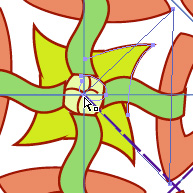
1 Start from the last pattern in the preceding section or open the file Handles1.ai. Apply a stroke color and some small stroke weight to the control path to make it visible.
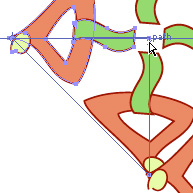
2 Now you will add two supplementary lines whose intersection defines the necessary supporting point. Make sure that Smart Guides are turned on. Select the pen tool in the toolbox. Click the bottom anchor of the control path, hold down the Shift key, and click somewhere in the upper-right corner of the screen (outside the pattern) to draw a 45° diagonal line. Then draw a -45° diagonal line starting from the top-right anchor of the control path and ending somewhere outside the pattern in the lower-right corner of the screen. The intersection of the two diagonal lines defines the additional supporting point that you will use later in step 6.
4 Revert to the save version of the baskets pattern, if necessary. Then copy the entire pattern (choose Edit > Copy), return to the Handles1 window, select the handles pattern, and paste the baskets behind the handles (choose Edit > Paste In Back).
5 With the baskets pattern still selected, click the direct-selection tool in the toolbox, then click the left anchor of the control path of the baskets pattern and drag it to the top-right anchor of the handles pattern. Smart Guides will ensure that the two anchors coincide. You may want to zoom-in on this area to be able to see the anchors and text label hints clearly.
6 Choose Edit > Deselect All, then click the lower control anchor of the baskets pattern and drag it to the intersection of the two diagonal lines, which you created in step 2. The baskets pattern snaps into its proper position.
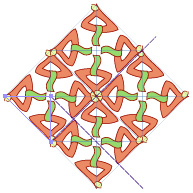
7 Verify that the two patterns are indeed precisely aligned by applying a stroke to the control path of the baskets pattern.
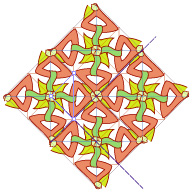
8 Finally, delete the supporting diagonal lines and set the stroke of both control paths to None.
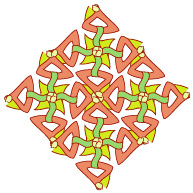
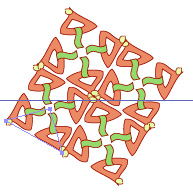
The pattern is ready. Note that by combining the pattern of two different symmetries, you created a less monotonous and generally more interesting pattern.